|
 Thank you
for buying our “Maritime Technic” pontoon building block system. Thank you
for buying our “Maritime Technic” pontoon building block system.
These instructions contain information for easy assembly and installation.
Please read them carefully to become as familiar as possible with the products.
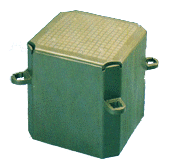
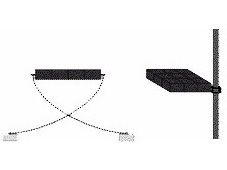
The single
pontoon elements can be assembled in the water as well as on land. At mounting on land the
assembly should take place on a flat ground (asphalt or concrete bottom etc.). At mounting
in water, the pontoon elements should not be charged, so that they lay in the water at the
same level and the connecting bolt (pin) can be inserted trough all 4 lugs (ears).
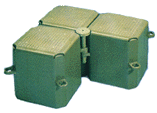
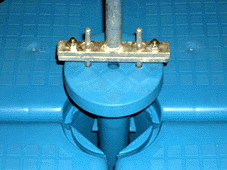
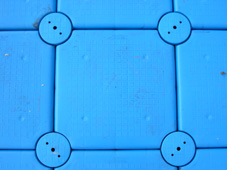
For assembly, place each 4 pontoon
elements tight to each other, so that all 4 lugs are in vertical line. Now one connecting
bolt is inserted through the 4 lugs and turned at 45 degree with the assembling wrench
(see figure). The connecting bolt fits so into the lowermost lug/ear and secures for a
stable but flexible connection.
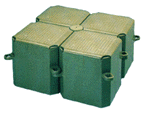
The remaining pontoon elements are assembled in the same manner, by adding 2 pontoon
elements and fixing by one connecting bolt, until the desired layout is reached. This
building block system can be varied according to any desired layout or measurements and
can be used to replace or extend existing pontoon systems.
 For the assembly of pontoon
elements it is important that the character „Maritime Technic“ is directed
always in the same direction, than all single lugs are automatically placed on the right
site. The character „Maritime Technic“ should be preferably on the front- or
backside (head or feet end) of the finished floating dock, as the 2 remaining lugs/ears
around the sides will than be automatically, directly (without distance) over each other. For the assembly of pontoon
elements it is important that the character „Maritime Technic“ is directed
always in the same direction, than all single lugs are automatically placed on the right
site. The character „Maritime Technic“ should be preferably on the front- or
backside (head or feet end) of the finished floating dock, as the 2 remaining lugs/ears
around the sides will than be automatically, directly (without distance) over each other.
The accessories can be mounted everywhere along any side on the lug-units (which are
available every 50 cm). The plastic accessory like side-screws and boat-cleats are mounted
directly on the lug-units. PU-fenders and corner-fenders are mounted with 1-2 side-screws
in plastic. Depending on the layout, maybe 1-2 distance discs (spacers) are necessary.
The metal accessory like railing-posts,
anchoring-eyes, fastening-cleats etc. can be mounted directly on the lug-units, or for a
more stable connection (better and recommended) on a side-bar.
Mounting of the side-bars (and bathing-ladders) is done
with 2-3 distance-discs and one side-screw per lug-unit. Instead of the side-screw, also
the attachment of other metal accessory (railing-post, anchoring-eye or fastening-cleat
etc.) is possible. The lug/ear units where no accessory is attached should be fixed
together with a quick fastener.
 The
finished dock can be moored like any other floating dock system, depending on water
structures (shore, bottom and depth) i.e. with piles and pile holders or anchors and ropes
etc. The
finished dock can be moored like any other floating dock system, depending on water
structures (shore, bottom and depth) i.e. with piles and pile holders or anchors and ropes
etc.
If there is any problem or question, just let us know!
|